Debug Build 的两种哲学:C++ 宏 vs Go 链接器注入
Posted on Tue 03 February 2026 in Journal
| Abstract | Debug Build 的两种哲学:C++ 宏 vs Go 链接器注入 |
|---|---|
| Authors | Walter Fan |
| Category | learning note |
| Status | v1.0 |
| Updated | 2026-02-03 |
| License | CC-BY-NC-ND 4.0 |
Debug Build 的两种哲学:C++ 宏 vs Go 链接器注入
引子:一个"老掉牙"的需求
你有没有遇到过这种场景:线上版本要精简日志、关掉性能分析,但本地调试时又想把所有"内裤"都翻出来看看?
这个需求老到我刚入行时就在写——那会儿是 C/C++,用的是 -DDEBUG 宏。十几年后,我切到 Go,发现 Go 的玩法完全不同:没有宏,但有 -ldflags -X 和 Build Tags。
今天就来聊聊这两种语言在"条件编译"上的哲学差异,顺便给出一套 Go 里的最佳实践。读完你能带走:
- C++ 宏方案的优缺点回顾
- Go 的
-X链接器注入是怎么回事 - Go Build Tags 的正确姿势
- 一个可直接抄的 Go 示例工程
一、C++ 的老朋友:-DDEBUG 宏
1.1 原理
C/C++ 的预处理器在编译前会先"扫一遍"源码,把所有 #ifdef / #ifndef 按条件展开。你在编译时传 -DDEBUG,就相当于在代码最前面加了一行 #define DEBUG。
// config.h
#ifdef DEBUG
    #define LOG_LEVEL 0   // 0 = TRACE
    #define ENABLE_PROFILING 1
#else
    #define LOG_LEVEL 2   // 2 = WARN
    #define ENABLE_PROFILING 0
#endif
编译命令:
# Debug 版本
g++ -DDEBUG -g -O0 main.cpp -o app_debug

# Release 版本
g++ -DNDEBUG -O2 main.cpp -o app_release
1.2 优点
- 零运行时开销:条件在编译期就决定了,Release 版本里根本不存在 Debug 代码的机器码。
- 灵活:可以定义任意多个宏,组合出各种 Feature Flag。
- 生态成熟:几乎所有 C/C++ 项目都这么干,IDE、调试器、CI 都支持得很好。
1.3 缺点
- 宏地狱:用多了代码会变成"井字棋",可读性急剧下降。
- 难调试:预处理后的代码和你看到的源码不一样,出问题时要先
g++ -E展开看。 - 跨平台噩梦:Windows 的
_DEBUGvs Linux 的DEBUG,再加上各种_WIN32、__APPLE__……
二、Go 的新思路:-ldflags -X 链接器注入
Go 没有预处理器,也没有宏。官方的态度很明确:"宏是万恶之源"(好吧,他们没这么说,但意思差不多)。
那 Go 怎么做条件编译呢?答案是两个机制:
-ldflags -X:在链接阶段往变量里"注入"值- Build Tags:按文件级别选择性编译
先说第一个。
2.1 原理
Go 允许你在 go build 时通过 -ldflags 传参数给链接器。其中 -X 可以给 包级别的字符串变量 赋值。
// internal/version/version.go
package version

var (
    Version    = "dev"
    GitCommit  = "unknown"
    DebugBuild = "false"  // 注意:必须是 string 类型
)
编译时注入:
go build -ldflags "-X 'myapp/internal/version.Version=1.2.3' \
                   -X 'myapp/internal/version.GitCommit=abc1234' \
                   -X 'myapp/internal/version.DebugBuild=true'" \
         -o myapp ./cmd/myapp
2.2 使用方式
在代码里判断:
package main

import (
    "fmt"
    "myapp/internal/version"
)

func main() {
    fmt.Printf("Version: %s, Commit: %s\n", version.Version, version.GitCommit)

    if version.DebugBuild == "true" {
        fmt.Println("[DEBUG MODE] Extra diagnostics enabled")
        // 启用更详细的日志、pprof 等
    }
}
2.3 优点
- 简单粗暴:不需要改代码逻辑,只需要在 CI/CD 脚本里改编译命令。
- 版本信息注入:顺便把 Git Commit、Build Time 都塞进去,上线后
--version一目了然。 - 没有宏污染:代码里就是普通的
if判断,可读性好。
2.4 缺点
- 只能是 string:想注入
bool或int?不好意思,自己strconv.ParseBool。 - 有运行时开销:虽然很小,但
if version.DebugBuild == "true"每次都要比较字符串。 - 不能删代码:Debug 版本和 Release 版本的二进制里,代码都存在,只是"不执行"。
这第三点其实是最大的问题。如果你的 Debug 代码里有敏感信息(比如硬编码的测试密钥),Release 版本里照样能被反编译出来。
三、Go Build Tags:文件级别的"条件编译"
如果你真的想让 Debug 代码在 Release 版本里"物理消失",Go 提供了 Build Tags(也叫 Build Constraints)。
3.1 原理
在 Go 源文件的 第一行(package 声明之前)加一个特殊注释:
//go:build debug

package myapp

// 这个文件只在 go build -tags debug 时才会被编译
或者用文件名约定:xxx_debug.go 配合 xxx_release.go。
3.2 示例结构
myapp/
├── cmd/
│   └── myapp/
│       └── main.go
├── internal/
│   └── logger/
│       ├── logger.go         # 公共接口
│       ├── logger_debug.go   # debug 实现
│       └── logger_release.go # release 实现
└── go.mod
logger.go(公共接口):
package logger

// Logger 是日志接口
type Logger interface {
    Debug(msg string, args ...any)
    Info(msg string, args ...any)
    Warn(msg string, args ...any)
    Error(msg string, args ...any)
}

// New 返回一个 Logger 实例(由 debug/release 文件提供具体实现)
// 这个函数的实现在 logger_debug.go 或 logger_release.go 中
logger_debug.go:
//go:build debug

package logger

import (
    "fmt"
    "runtime"
    "time"
)

type debugLogger struct{}

func New() Logger {
    return &debugLogger{}
}

func (l *debugLogger) Debug(msg string, args ...any) {
    _, file, line, _ := runtime.Caller(1)
    fmt.Printf("[DEBUG] %s %s:%d - %s\n",
        time.Now().Format("15:04:05.000"), file, line, fmt.Sprintf(msg, args...))
}

func (l *debugLogger) Info(msg string, args ...any) {
    fmt.Printf("[INFO] %s - %s\n", time.Now().Format("15:04:05"), fmt.Sprintf(msg, args...))
}

func (l *debugLogger) Warn(msg string, args ...any) {
    fmt.Printf("[WARN] %s - %s\n", time.Now().Format("15:04:05"), fmt.Sprintf(msg, args...))
}

func (l *debugLogger) Error(msg string, args ...any) {
    fmt.Printf("[ERROR] %s - %s\n", time.Now().Format("15:04:05"), fmt.Sprintf(msg, args...))
}
logger_release.go:
//go:build !debug

package logger

import (
    "fmt"
    "time"
)

type releaseLogger struct{}

func New() Logger {
    return &releaseLogger{}
}

func (l *releaseLogger) Debug(msg string, args ...any) {
    // Release 版本:Debug 日志直接丢弃,零开销
}

func (l *releaseLogger) Info(msg string, args ...any) {
    fmt.Printf("[INFO] %s - %s\n", time.Now().Format("15:04:05"), fmt.Sprintf(msg, args...))
}

func (l *releaseLogger) Warn(msg string, args ...any) {
    fmt.Printf("[WARN] %s - %s\n", time.Now().Format("15:04:05"), fmt.Sprintf(msg, args...))
}

func (l *releaseLogger) Error(msg string, args ...any) {
    fmt.Printf("[ERROR] %s - %s\n", time.Now().Format("15:04:05"), fmt.Sprintf(msg, args...))
}
3.3 编译方式
# Debug 版本
go build -tags debug -o myapp_debug ./cmd/myapp

# Release 版本(默认,不加 tags)
go build -o myapp_release ./cmd/myapp
3.4 Build Tags 语法速查
//go:build linux           // 只在 Linux 编译
//go:build windows         // 只在 Windows 编译
//go:build debug           // 只在 -tags debug 时编译
//go:build !debug          // 只在 没有 -tags debug 时编译
//go:build linux && amd64  // Linux 且 amd64
//go:build linux || darwin // Linux 或 macOS
//go:build ignore          // 永远不编译(用于存档)
注意:Go 1.17+ 推荐用 //go:build 语法,老的 // +build 语法虽然还支持,但已经不推荐。
四、完整示例:三种方式对比
来看一个完整的示例项目,同时演示 -X 注入和 Build Tags。
4.1 项目结构
debugdemo/
├── cmd/
│   └── debugdemo/
│       └── main.go
├── internal/
│   ├── version/
│   │   └── version.go
│   └── debug/
│       ├── debug.go
│       ├── profiler_debug.go
│       └── profiler_release.go
├── go.mod
├── Makefile
└── README.md
4.2 核心代码
go.mod:
module debugdemo

go 1.21
internal/version/version.go:
package version

// 这些变量会在编译时通过 -ldflags -X 注入
var (
    Version    = "dev"
    GitCommit  = "unknown"
    BuildTime  = "unknown"
    DebugBuild = "false"
)

// IsDebug 返回是否为 Debug 构建
func IsDebug() bool {
    return DebugBuild == "true"
}
internal/debug/debug.go:
package debug

import (
    "fmt"
    "debugdemo/internal/version"
)

// PrintBuildInfo 打印构建信息
func PrintBuildInfo() {
    fmt.Println("========== Build Info ==========")
    fmt.Printf("Version:     %s\n", version.Version)
    fmt.Printf("Git Commit:  %s\n", version.GitCommit)
    fmt.Printf("Build Time:  %s\n", version.BuildTime)
    fmt.Printf("Debug Build: %s\n", version.DebugBuild)
    fmt.Println("================================")
}
internal/debug/profiler_debug.go:
//go:build debug

package debug

import (
    "fmt"
    "net/http"
    _ "net/http/pprof"
)

func init() {
    fmt.Println("[DEBUG] pprof profiler enabled at :6060/debug/pprof")
}

// StartProfiler 启动性能分析服务器
func StartProfiler() {
    go func() {
        if err := http.ListenAndServe(":6060", nil); err != nil {
            fmt.Printf("[DEBUG] pprof server error: %v\n", err)
        }
    }()
}

// TraceFunction 函数调用追踪(仅 Debug 版本有效)
func TraceFunction(name string) func() {
    fmt.Printf("[TRACE] Entering: %s\n", name)
    return func() {
        fmt.Printf("[TRACE] Leaving: %s\n", name)
    }
}
internal/debug/profiler_release.go:
//go:build !debug

package debug

// StartProfiler 在 Release 版本中是空操作
func StartProfiler() {
    // Release 版本不启动 pprof
}

// TraceFunction 在 Release 版本中是空操作
func TraceFunction(name string) func() {
    return func() {}
}
cmd/debugdemo/main.go:
package main

import (
    "fmt"
    "time"

    "debugdemo/internal/debug"
    "debugdemo/internal/version"
)

func main() {
    // 打印构建信息
    debug.PrintBuildInfo()

    // 启动 profiler(只在 debug 版本生效)
    debug.StartProfiler()

    // 演示函数追踪
    doSomeWork()

    // 根据 -X 注入的变量做判断
    if version.IsDebug() {
        fmt.Println("\n[DEBUG MODE] Running additional diagnostics...")
        runDiagnostics()
    }

    fmt.Println("\nApplication started successfully!")
}

func doSomeWork() {
    defer debug.TraceFunction("doSomeWork")()

    fmt.Println("Doing some work...")
    time.Sleep(100 * time.Millisecond)
}

func runDiagnostics() {
    fmt.Println("  - Memory check: OK")
    fmt.Println("  - Network check: OK")
    fmt.Println("  - Database check: OK")
}
4.3 Makefile
# Makefile for debugdemo

APP_NAME := debugdemo
VERSION := $(shell git describe --tags --always --dirty 2>/dev/null || echo "dev")
GIT_COMMIT := $(shell git rev-parse --short HEAD 2>/dev/null || echo "unknown")
BUILD_TIME := $(shell date -u '+%Y-%m-%dT%H:%M:%SZ')

LDFLAGS := -X 'debugdemo/internal/version.Version=$(VERSION)' \
           -X 'debugdemo/internal/version.GitCommit=$(GIT_COMMIT)' \
           -X 'debugdemo/internal/version.BuildTime=$(BUILD_TIME)'

.PHONY: all build-debug build-release clean run-debug run-release

all: build-debug build-release

# Debug 版本:启用 pprof,启用函数追踪
build-debug:
    @echo "Building debug version..."
    go build -tags debug \
        -ldflags "$(LDFLAGS) -X 'debugdemo/internal/version.DebugBuild=true'" \
        -o bin/$(APP_NAME)_debug ./cmd/$(APP_NAME)
    @echo "Debug build complete: bin/$(APP_NAME)_debug"

# Release 版本:禁用 pprof,禁用函数追踪,开启优化
build-release:
    @echo "Building release version..."
    go build -ldflags "$(LDFLAGS) -s -w" \
        -o bin/$(APP_NAME)_release ./cmd/$(APP_NAME)
    @echo "Release build complete: bin/$(APP_NAME)_release"

run-debug: build-debug
    @echo "\n=== Running Debug Version ===\n"
    ./bin/$(APP_NAME)_debug

run-release: build-release
    @echo "\n=== Running Release Version ===\n"
    ./bin/$(APP_NAME)_release

clean:
    rm -rf bin/

# 对比两个版本的二进制大小
compare:
    @echo "Binary size comparison:"
    @ls -lh bin/
4.4 运行效果
Debug 版本:
$ make run-debug

=== Running Debug Version ===

[DEBUG] pprof profiler enabled at :6060/debug/pprof
========== Build Info ==========
Version:     v1.0.0
Git Commit:  abc1234
Build Time:  2026-02-03T10:00:00Z
Debug Build: true
================================
[TRACE] Entering: doSomeWork
Doing some work...
[TRACE] Leaving: doSomeWork

[DEBUG MODE] Running additional diagnostics...
  - Memory check: OK
  - Network check: OK
  - Database check: OK

Application started successfully!
Release 版本:
$ make run-release

=== Running Release Version ===

========== Build Info ==========
Version:     v1.0.0
Git Commit:  abc1234
Build Time:  2026-02-03T10:00:00Z
Debug Build: false
================================
Doing some work...

Application started successfully!
注意看区别:
- Debug 版本有 [TRACE] 输出、[DEBUG] pprof 提示、诊断信息
- Release 版本干干净净,没有任何多余输出
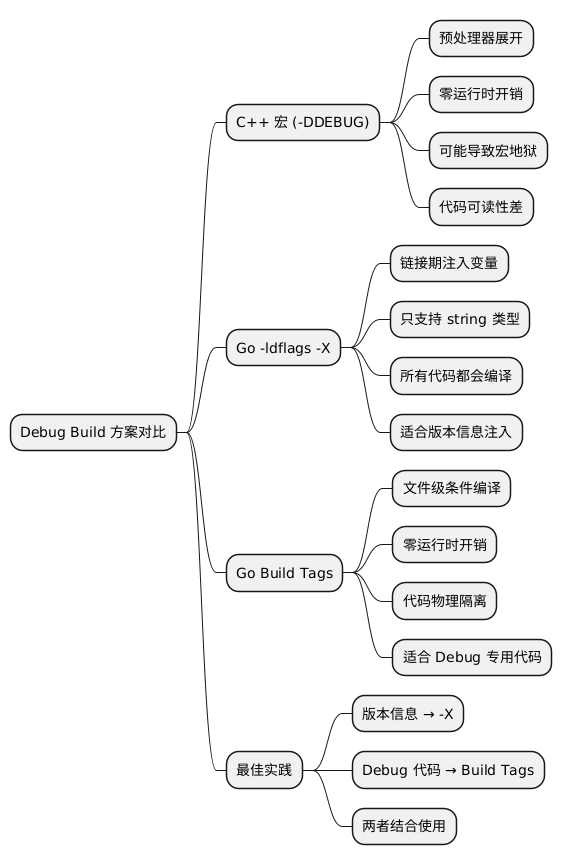
五、方案对比总结
| 特性 | C++ -DDEBUG |
Go -X 注入 |
Go Build Tags |
|---|---|---|---|
| 编译期 vs 运行期 | 编译期 | 链接期(值),运行期(判断) | 编译期 |
| 代码是否被编译 | 不满足条件的代码不编译 | 所有代码都编译 | 不满足条件的文件不编译 |
| 运行时开销 | 零 | 极小(字符串比较) | 零 |
| 灵活性 | 高(任意粒度) | 中(仅字符串变量) | 中(文件级别) |
| 可读性 | 差(宏嵌套) | 好 | 好 |
| 敏感信息泄露风险 | 低(代码不存在) | 高(代码存在) | 低(代码不存在) |
| 学习成本 | 中 | 低 | 低 |
5.1 我的建议
- 版本信息、Feature Flag:用
-ldflags -X,简单直接。 - Debug 专用代码(pprof、详细日志):用 Build Tags,确保 Release 版本不包含。
- 两者结合:用
-X注入版本号和DebugBuild标志,用 Build Tags 控制重型 Debug 代码。
六、常见问题
Q1: -X 只能注入 string,怎么注入 bool?
// 定义
var DebugBuild = "false"

// 使用
func IsDebug() bool {
    return DebugBuild == "true"
}

// 或者用 strconv
import "strconv"
func IsDebug() bool {
    v, _ := strconv.ParseBool(DebugBuild)
    return v
}
Q2: Build Tags 文件怎么保证接口一致?
用 Interface。在 xxx.go 里定义接口,xxx_debug.go 和 xxx_release.go 分别实现。编译器会帮你检查。
Q3: 能不能同时用多个 tags?
可以。
go build -tags "debug integration" -o myapp ./cmd/myapp
//go:build debug && integration
package myapp
Q4: 怎么查看当前编译用了哪些 tags?
go list -f '{{.GoFiles}}' -tags debug ./...
七、总结
从 C++ 的"宏世界"走到 Go 的"无宏世界",一开始确实有点不适应。但用久了会发现,Go 的方案虽然没有那么"灵活",但胜在简单、可读、不容易出幺蛾子。
今天聊了三种方案:
- C++
-DDEBUG:预处理器宏,灵活但容易写成"井字棋" - Go
-ldflags -X:链接期注入,适合版本信息和简单开关 - Go Build Tags:文件级条件编译,适合重型 Debug 代码
记住一句话:用 -X 控制"开关",用 Build Tags 控制"代码量"。
@startmindmap
* Debug Build 方案对比
** C++ 宏 (-DDEBUG)
*** 预处理器展开
*** 零运行时开销
*** 可能导致宏地狱
*** 代码可读性差
** Go -ldflags -X
*** 链接期注入变量
*** 只支持 string 类型
*** 所有代码都会编译
*** 适合版本信息注入
** Go Build Tags
*** 文件级条件编译
*** 零运行时开销
*** 代码物理隔离
*** 适合 Debug 专用代码
** 最佳实践
*** 版本信息 → -X
*** Debug 代码 → Build Tags
*** 两者结合使用
@endmindmap
Checklist:Debug Build 方案选型
- [ ] 明确需求:是"开关"还是"代码隔离"?
- [ ] 版本信息注入:用
-ldflags -X - [ ] 简单 Feature Flag:用
-ldflags -X+if判断 - [ ] 重型 Debug 代码(pprof、详细日志):用 Build Tags
- [ ] 敏感测试代码:必须用 Build Tags,确保 Release 不包含
- [ ] Makefile/CI 脚本:区分
build-debug和build-releasetarget
下次写 Go 项目时,不妨把这套方案用起来,告别"线上忘关 Debug 日志"的尴尬。
参考资料
本作品采用知识共享署名-非商业性使用-禁止演绎 4.0 国际许可协议进行许可。